Bead Storage Tips - By Color!
Hey Crafty Friends!
I wanted to share how I organize my bead stash—it's something that comes up a lot in bead groups, especially when folks realize just how fast their collection can grow!
After years of trying (and failing) with jars and bags, I finally found a system that’s worked for me for about 15 years now. My main goals were:
✅ To be able to see what I have
✅ To access things quickly—without having to dig through stuff every time I start a project.
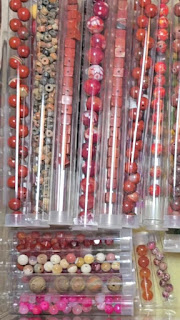
Here’s what I landed on: clear plastic tubes paired with acrylic makeup chests. It’s simple, affordable, and easy to maintain. The clear drawers and tubes mean I can find what I need at a glance, and labeling makes the process even smoother. Please note I'm not an affiliate for any of the products listed - I truly love them for my own use!
 🗂 How I Sort and Label:

I don’t usually label the beads themselves (unless it’s a gemstone I want to remember—then I just slip the tag into the tube). Instead, I label the drawers by type and color. For example:
-
Gemstone beads – color
-
Czech glass – color
-
Pearls – color
-
Wood – color
-
Bead strands (these haven’t been sorted into tubes yet)
I don’t work much with seed beads or crystals, so they’re sorted into broad color groups like “reds/oranges/yellows” or “blues/greens/purples.”
I’ve also dedicated drawers just for Czech leaves, Czech flowers, and animal-shaped beads—because those deserve a special spot!
Currently, I use 13 acrylic drawer chests, each filled with various tube sizes. Here's a breakdown of the storage system:
📦 Supplies I Use:
Acrylic Makeup Chests


One of the things I love about the clear acrylic drawers is that once you pull them out, you can peek in from either end. This makes it super easy to scan your stash and spot specific bead shapes by color—especially helpful when you know you’ve got something and just need to lay eyes on it. Easy peasy!
Clear Plastic Tubes

6" x 7/6" clear plastic tubes - for longer bead strands for beads of all sizes
3" x 9/16" clear plastic tubes - most common; fits medium-sized strands
2" x 9/16" clear plastic tubes - perfect for small leftovers or tiny beads

8" x 1" clear plastic tubes with corks - for larger beads (note: corks can come loose, so push them in snugly!)
📝 Tip: I usually take beads off the string before storing them—makes them easier to grab when designing.
🏷 Tools That Make Life Easier

I can’t live without this. I use it in my studio and my kitchen. It’s easy to use, has multiple font sizes, and even allows two lines of text on one label.

I’ve tried clear and paper tapes, but white plastic is my favorite. It’s easy to read, wipes clean, and doesn’t disappear visually like clear tape sometimes does against colorful backgrounds.
Final Thoughts
This is somewhat of an investment, but this setup has saved me so much time, frustration, and clutter over the years. Everything has a place, I can see what I have, and I don’t waste time digging for that one perfect bead. Plus it is pretty, too! I hope this gives you a few ideas if you're looking to improve or overhaul your own bead storage system!
If you’ve got a favorite storage trick, I’d love to hear about it—drop a comment and share your setup!
To shop for handmade jewelry to add to your collection, visit my shop!


Comments
Post a Comment