Posts

Make Some Simple Earrings!

Image
Hey Crafty Makers! Earrings: the MVP of the jewelry world. Seriously—surveys say they’re the most-bought accessory out there. Why? Well, I’ve got some unscientific guesses: They're easy on the wallet They instantly jazz up whatever you're wearing They show up loud and proud in the mirror (hello, instant face-framing fabulousness) And sometimes, life just needs a new pair—post-haircut, new outfit, random Tuesday… you get it! The good news? You don’t need a shopping spree to get that earring high. With just a few basic tools and  supplies, you can DIY your way to earring heaven. Let’s dive in. Tools You'll Need Making earrings doesn’t require a ton of tools—just a few basics to get started. Here’s what I recommend: Chain nose pliers – great for gripping and opening/closing jump rings and loops Round nose pliers – essential for creating loops in your wire. Flush cutters – to cleanly trim excess wire. If you find yourself getting hooked (pun totally int...
Bead Storage Tips - By Color!

Image
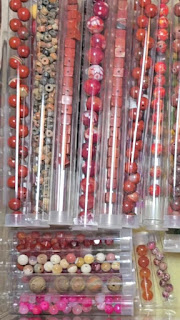
Hey Crafty Friends!  I wanted to share how I organize my bead stash—it's something that comes up a lot in bead groups, especially when folks realize just how fast their collection can grow! After years of trying (and failing) with jars and bags, I finally found a system that’s worked for me for about 15 years now. My main goals were: ✅ To be able to see what I have ✅ To access things quickly—without having to dig through stuff every time I start a project. Here’s what I landed on: clear plastic tubes paired with acrylic makeup chests . It’s simple, affordable, and easy to maintain. The clear drawers and tubes mean I can find what I need at a glance , and labeling makes the process even smoother.  Please note I'm not an affiliate for any of the products listed - I truly love them for my own use! 🗂 How I Sort and Label: I don’t usually label the beads themselves (unless it’s a gemstone I want to remember—then I just slip the tag into the tube). Instead, I label the drawe...

Care for What You Love! Clean Your Jewelry!

Image
We all have that one guilty pleasure – fashion jewelry!  But let's be honest, how often do we give our beloved baubles the TLC they deserve? Not too long ago, I had an epiphany. While I was meticulously caring for my fine jewelry, my fashion pieces were scattered all over – the nightstand, the sink, or, gasp --  tossed into a drawer to become a tangled, tarnished mess! I realized I didn't give them much respect.  Sound familiar? So, I've made a commitment to myself (and my jewelry) to start giving my fashion pieces the respect they deserve. After all, I enjoy wearing them just as much – if not more – than my jewelry store treasures!   It starts with cleaning and using the right products. Here’s my list of cleaning/polishing must-haves and wish-list items, complete with affiliate links for easy shopping. Let’s give our fabulous fashion jewelry the love it deserves! For Polishing: Sunshine Polishing Cloths   These come in singles and packs.  They are abs...

The 7 C's - Why to Buy Handmade Jewelry

Image
  Those who know fine jewelry, may be familiar with the 5 C's of diamonds.  That got me thinking, what are some of the reasons people might purchase hand-crafted jewelry?   There are some people who will only wear fine jewelry.  And there are others who wear very little jewelry.  In the middle are the individualists who love to wear hand-crafted jewelry.  They peruse the art shops and festivals in search of their next wearable treasure. But why?  What makes handmade jewelry so desirable?  Let's take a look at the 7 C's of Handmade jewelry - and yes, this is my own list from my experience.  There's not much scientific about it. Chic!   Handmade jewelry is usually designed with current trends in mind. Much of the handmade jewelry today is made in a jeweler's home studio and supplies are purchased from local bead shops or specialty shops online.  This enables designers to pivot with the trends.  An example of trendy jewe...

Easy Steps for a "Let It Snow" Pendant and Necklace

Image
This is a winter necklace is a little thing I whipped up for myself one afternoon.  I thought I'd share a basic how-to for this "Let It Snow" design!  Although it not in my shop at Bee City Studio , there are other necklaces available if you would like to shop now. One nice thing about snow-themed items is you can wear them all winter!  This pendant is inexpensive to make and lots of fun.  The supplies you will need are as follows: Pendant: Mold putty Plastic snow flakes (I got mine at Walmart in an end aisle, displayed with packages of novelty buttons) Polymer Clay - grey, blue, silver or while - I used silver Metallic paints - I used Ice Blue, Midnight Blue White craft paint Varathane Glossy Sealer Tools: Pasta machine (or your fingers, be prepared to really work them) Glass or plexi-glass as a rolling surface Plastic or acrylic rolling tool Round cutter (I used a lid from some candy sprinkles) Hand drill or dremel tool to make the hole after baking  - O...

Tool Guide for Beginning Jewelry Designers

Image
Recently, I put together this "must-have" tool guide for new jewelry designers!  This guide is for beginners, but we experienced folks have these same tools in our shops - they're that important.   If you don't like scrolling and commentary in between, skip to the video at the end.  You'll be able to adjust the speed if needed - just use the settings button on the video. Thanks for visiting - please leave a comment if you enjoy the guide, have questions, or have other suggestions!   If you want to browse or purchase jewelry, visit my store and shop now.   So glad you're here at the Heart of the Hive!  I think this will be valuable information for new jewelry designers! Nearly 20 years ago my friend open a bead store and helped me make a pair of earrings.  I was hooked immediately, and knew as a maker and crafter, I had found my niche!  I started with very minimal tools and struggled to find my way.  The whole landscape was new to m...